-
Accuracy
-
Fire Rate
-
Range
-
Handling
-
Mobility
-
Battle Effectiveness
Feel like your Nerf Hammershot is missing something? Do you want your Hammershot to be more like Wolverine? Or The Terminator? Well, get ready to install a full metal endoskeleton into your Hammershot…
Blasterparts Full Metal Nerf Hammershot Mod Kit
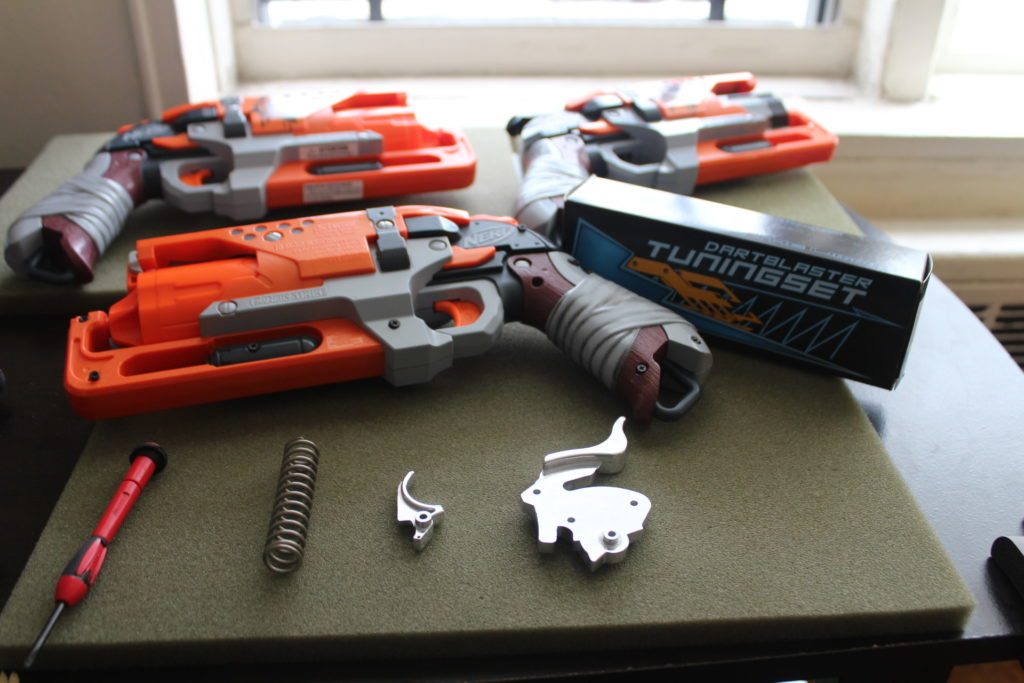
Here is the description of the kit from the manufacturer, Blasterparts: “Stylish metal revolver cock and trigger for installation in the Hammershot provide incomparable revolver feeling. The included modification spring provides the according performance.” That’s right, folks, in addition to a few beautiful full metal replacement pieces, this kit also includes a super beefy spring for your Nerf Hammershot. Cool. Let’s take a closer look.
What’s in the Blasterparts box?!
Inside the box, you’ll find that they have kept it relatively simple. The whole Blasterparts Full Metal Nerf Hammershot Mod Kit includes only 3 pieces. A replacement trigger and a replacement hammer, both in stunningly perfect full metal. The last part is a very beefy spring that makes the stock spring look quite puny. Flawless.
Blasterparts Full Metal Nerf Hammershot Mod Kit Installation.:
We’ve unboxed the Blasterparts Full Metal Nerf Hammershot Mod Kit, now it’s time to unbox the Nerf Hammershot itself! All you will need for that is a screwdriver. Unscrew all of the screws from the shell and then either remove them or leave them in the shell. Then, move the screws and the top half of the Hammershot shell and put them both somewhere safe. That should leave you looking something like in the picture up above. Next, it’s time to actually start the installing part of the installation.
In this photo, I have taken the white holding plate off by removing the three screws holding it down. This plate covers the hammer and trigger assembly, holding them in place securely. Since we’re going to be removing all of those pieces, we need to remove the plate. Take it off and keep it off to the side, with the screws. I’ve also lifted the spring rod up and taken the stock Hammershot spring off. You can see it in the bottom left of the picture, right next to the beefed up Blasterparts spring.
The next step is a bit drastic. You’re going to have to grab the Hammer assembly, which includes the spring rod and the plunger rod, and just rip the entire thing out. I’m kidding, clearly. Do not rip it out. Tilt the plunger tube (the white cylindrical thing) up on a slight angle as you’re lifting the Hammer assembly off of its metal rod, and pull the plunger rod straight out of the tube. Once again, things should look something like in the above reference picture.
STOP!….. It’s Hammer Time! Next up, you have to grab a hammer. I didn’t really take enough pics during this segment, so for a detailed look at what I do here, you’ll want to check out my YouTube video. Anyways, you have to take the hammer and hammer out the metal pegs that are holding the priming rod and spring rod onto the hammer. Using a hammer and a small screwdriver, you can hammer them out fairly easy. Just make sure you hammer the opposite side of the rough end of the metal peg. Then, you have to hammer the metal pegs through the holes in the priming and spring rods and back into the new metal Hammer.
Here’s a closeup shot of how it should look after you hammer both pegs back in and reconnect the plunger rod and the spring rod to the new metal cocking hammer. I’ve reinserted it back into the Hammershot shell by sliding the plunger rod back into the white tube and then pressing the hammer back down onto the large metal rod that holds it in place. Note: Before placing the plunger rod back, I actually pulled off the o-ring and lined the plunger head with some tape to increase the air seal. This isn’t necessary, but it is an option if you’re looking for peak performance.
In this photo, I have installed the new beefed up 9kg spring. Simply slide the spring onto the spring rod and compress it enough to squeeze it back into place. Make sure the bottom of the spring is aligned properly in the center of the white base of the internal casing. Remember, the spring rod has to travel through the middle of the spring as it is compressed. If it’s misaligned, your Hammershot will not function properly. All that’s left now is to replace the trigger…
This is what the new trigger will look like when it is properly fitted into place. Remove the stock trigger by lifting it straight up. You will see the trigger return spring underneath, and when you lift the trigger off of it, you will see it unwind a little bit. You have to fit the new trigger on top of the spring and onto the metal rod while also inserting the very end of the spring post through a small hole at the top of the trigger. Make sure the spring is wound back up into the proper orientation. That’s it, the Blasterparts kit is fully installed! Time to reassemble the Nerf Hammershot.
First things first, it’s time to place the cover plate back over the hammer assembly. Now this part is a tiny bit trickier than just slapping the plate on and screwing it in. First off, if you’ve left the screws inside of the plate while it was off, it’s time to fully remove the screws. Place them just to the side and then try lining the plate up with the three screw ports and the pegs coming up through the hammer and the trigger. Even when perfectly lined up, it won’t go back into place. You actually have to pull the hammer back just a tiny bit with one hand. With the other hand, snap the plate back into place. Holding the plate down the whole time, grab your screwdriver and go to town. Done!
Congratulations! You’ve made it to the end of another successful mod kit installation. The Blasterparts Full Metal Hammershot Modification Kit is a work of art and it’s absolutely brilliant. Check out my YouTube video down below to see it in action!
Well, that’s all for this one, folks. I hoped you enjoyed reading and/or watching this installation guide for the Blasterparts Full Metal Hammershot mod kit. As always, thanks for visiting the site and I hope to see you back again soon. If you still want more, be sure to swing by my Instagram page and hit that follow button. We have a lot of fun over there. Here’s a shameless plug.:
Blasterparts Full Metal Hammershot Modification Kit

